“When you look a wild animal in the eye, it’s like catching a glimpse into the soul of nature itself”
-Paul Oxton
I started working on this piece on the 31st of March this year and I took my own sweet time with it. Not that I had nothing to work on, in fact, I was in the midst of working on a whole new series of artworks WHEN I received an invite to participate in a ‘by invitation only” group exhibition.
The theme is “LangUR“, a visual arts exhibition to create awareness in the Dusky Leaf Monkey (Langurs) conservation which will be held in August 2021 at Penang State Art Gallery. Part of the proceeds from sold artworks will be donated to the “Langur Project Penang (LPP)” organisation https://langurprojectpenang.com/.
This is definitely something that I could never resist. Art for a good cause, a purpose. Immediately I knew that I will be going full-on Realism with this one.
I wasted no time and did some research on the LPP organisation. Once I understood what the organisation is all about, I contacted the founder, Ms. Jo Leen Yap, and received her permission to use one of her photo as reference for my coloured pencil artwork.
I received the invitation on the 3rd week of March and the submission deadline is on the 1st of June. Ample of time right?? But knowing how slow colour pencil is, I knew that it’s best that I get started on it ASAP.

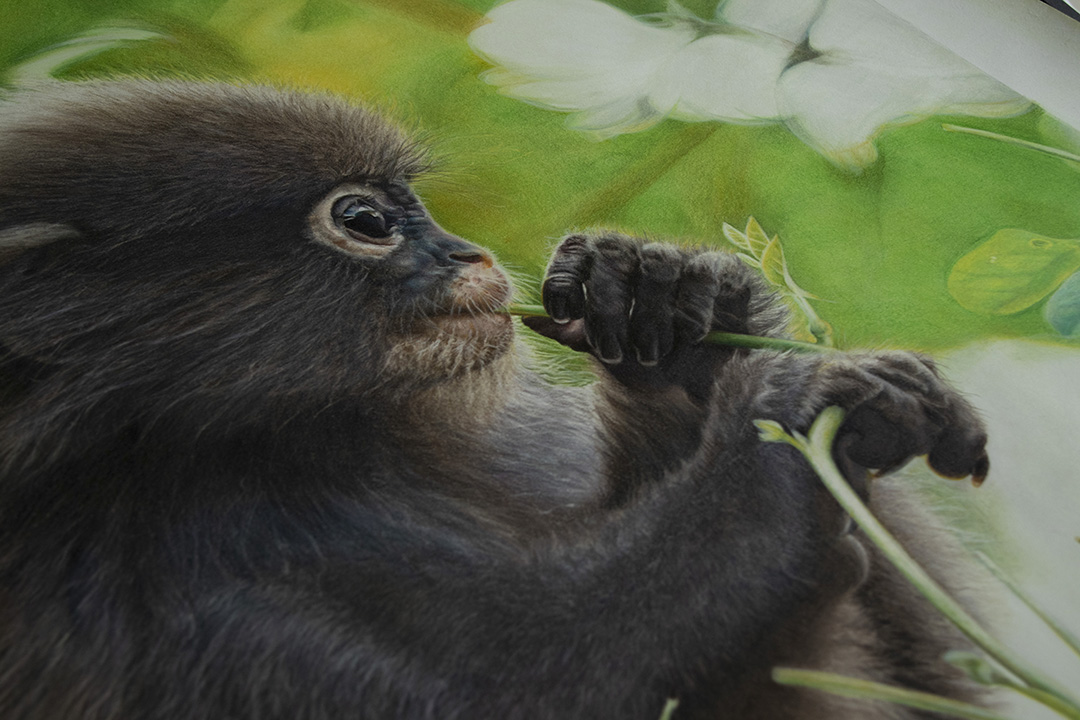
Why did I chose this particular photo to work with?
After going through almost all the photos that LPP has on their website and social media, I kept coming back to this particular piece. I can’t really explain why. I guess I was drawn to its faraway look and those hand and fingers.
Now, a bit on the technical method.
For this, I’m using the 140lbs (300gsm) hot pressed Arches aquarelle paper. Faber-Castell Albrecht Durer (water soluble pencils), Faber-Castell Polychromos and Caran D’ache Luminance colour pencils.
There is a minimum size requirement for all 2D artwork, nothing smaller than 24 x 24 inches (61 x 61 cm). I’m OK with that since I like working big, easier to work on the details. I decided on a 30 x 24 inches (76 x 61 cm).

To enlarge the subject from the A4 print out reference, I use my favourite grid method (as you can see on the working piece). I won’t go too technical here, it gets quite boring.
To achieve a smoother coverage on the green background, I used the water soluble colour pencils. What I did was shave off the lead of the pencils, a few mixes of colours, mix them up in water, apply them onto the paper and leave it to completely dry for 24 hours.
This technique acts as an underpainting. It eliminates the annoying white spots (which are actually the tooth of the paper) that will normally show through when using the dry pencils. Especially when working on large surfaces.

The next thing I did was apply layers of various shades of green on top of the underpainting with the dry pencils. This needs a lot of patience and discipline. The strokes and pressures of the pencils need to be as even as possible to avoid the unsightly scribbly lines.
Once all the desired tones are applied, I used a stencil brush to blend for an even, soft finish.
After the background is done, the fun part starts…

I get asked a lot on how I create the furs. In fact, everytime when I work on furs and hair. Truth to be told, it is quite difficult to explain in detail. I guess one needs to really do an in-depth study on that. Maybe when you look at any furry animals, pay more attention to the fur growth? (That’s actually what I did with my bulldogs.)

Now, that’s only on the fur part. Next is the textures of the furs. To create the textures, my favourite tools for it are the Tombow Mono Zero eraser https://www.tombow.com/en/products/mono_zero/ and the battery operated erasers (I’m using the Derwent https://www.derwentart.com/en-us/p/2301931/professional/accessorieslegacy/erasers/derwent-battery-operated-eraser ,but really, any brand will do). They are now easily available in most art supply and stationery stores.

After applying the colours and tones of the furs, I used the Tombow Mono eraser to lift off the pigments to create fine highlight of the furs according to the strokes of the furs. The battery operated eraser is used on the larger and lighter areas. This technique is repeated until I get a nice textured surface.
My most anticipated section of this painting (which I saved it till last) is the hands and fingers. It is something that is rarely seen on a coloured pencil art. I want to highlight the gentleness of how the Langur was holding the stem of the shoots its munching on. Not to mention those little details of the half moon shaped fingernails!!! So nimble and adorable.

I have done paintings of primates several years back, the Orangutans to be specific. Comparing both Orangutans and Langurs, technique wise, they are pretty much the same except for the colour of their furs.
The part that I found to be the most challenging was the blurred green background. It took me around 3 days to get over it. Green, to me, until today, is the most challenging colour to work with.

I can’t wait to see what the other 69 artists have come up with for this exhibition in August. Hopefully the movement control order (MCO) in Malaysia will be lifted by then. I’ll keep you posted on the event when the time comes. So stay tuned!

situs slot gacor toto slot toto slot slot gacor